
This page contains odds and ends and submitted members’ photos.
How Tea And Biscuits Killed The British Car Industry!
The Jaguar That Won the 1953 Le Mans
Harv’s “Bare Knuckle” fight – July 2024
It all started when the choke would not stay locked on my 1970 MGB GT Hatchback….. The twist to lock just would not hold so, for a cold start I had to pull the knob with my left hand through the steering wheel and turn the ignition switch with my right hand and then hang onto the knob with my left hand until the engine was sufficiently warmed through to no longer need the choke… I decided enough was enough and ordered a new cable.
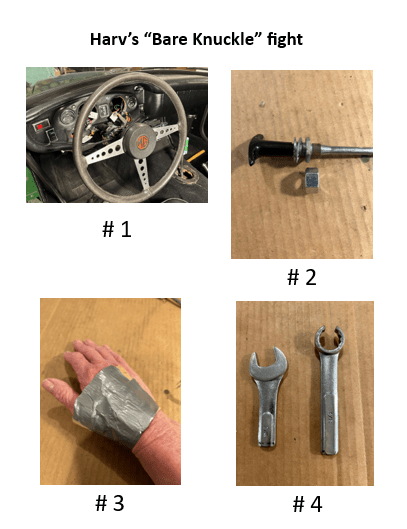
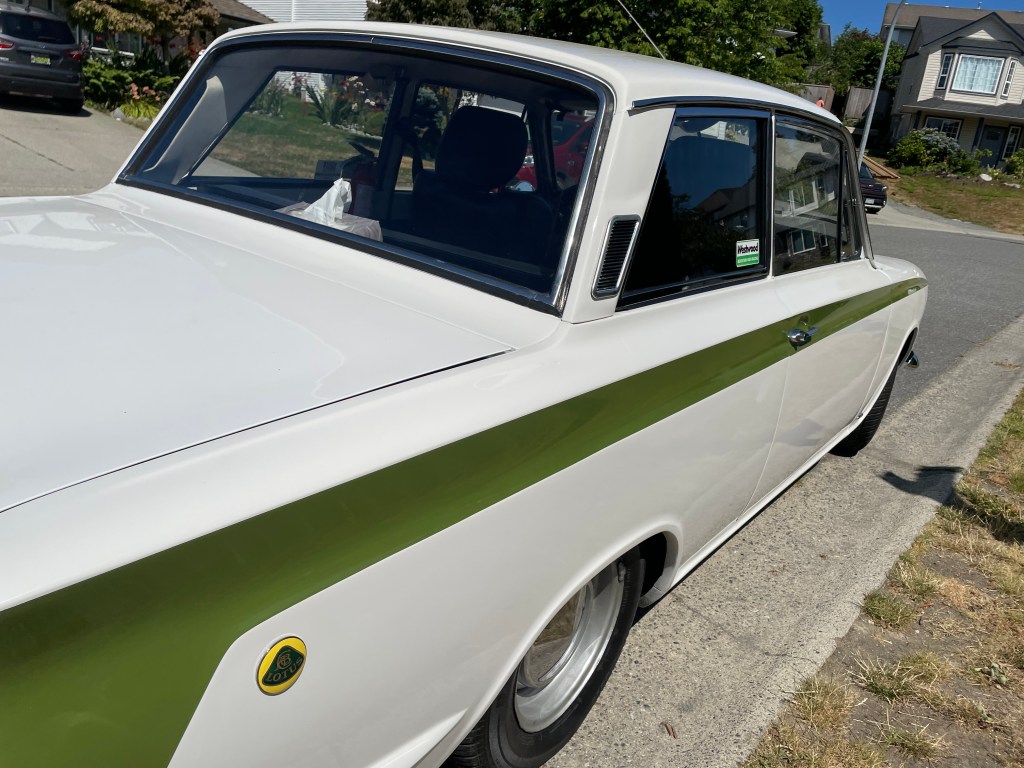
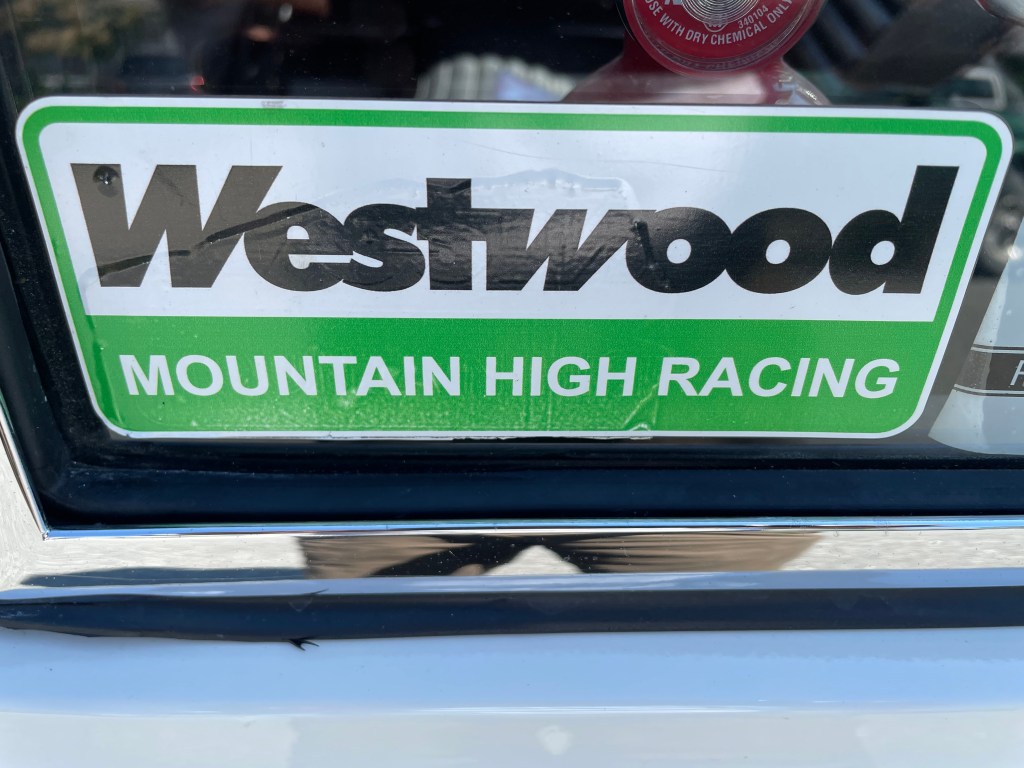
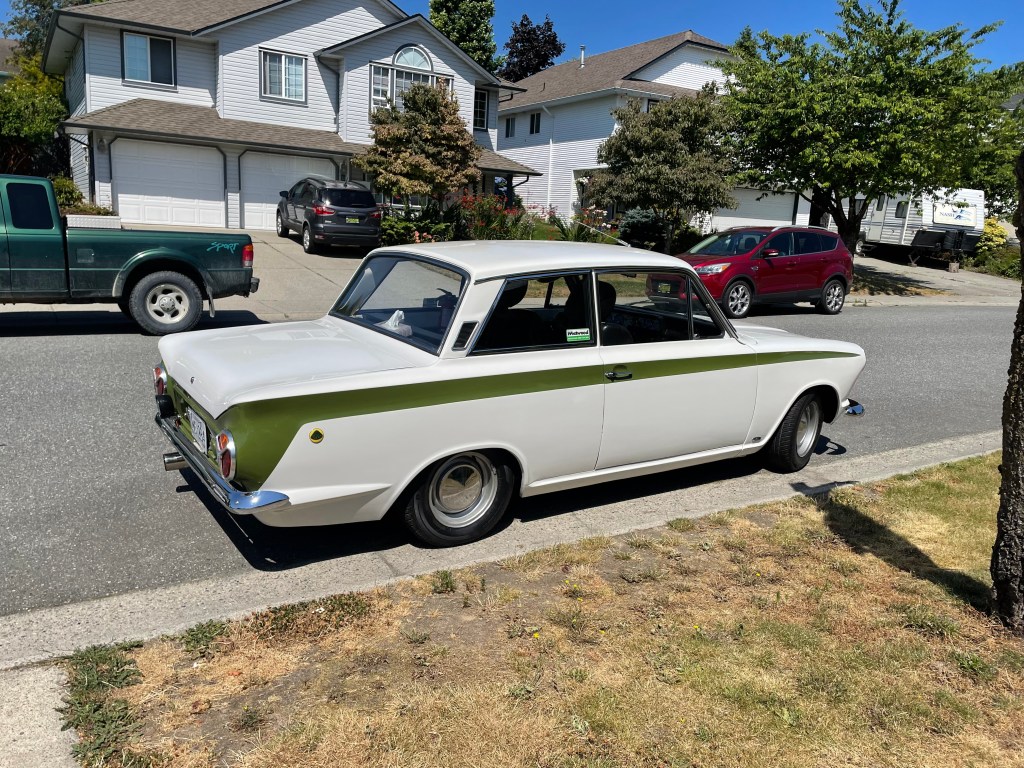
As to removing the existing cable, this turned out to be Round 1 of what was to become the “Bare Knuckle” fight. Having felt around behind the dash, it became clear that to get working access to the nut securing the choke pull, the speedometer and heat control would need to be removed. Ok, this should be straight forward…. Not so… getting access to the circular knurled nuts that clamp the distance pieces to hold the speedo in place required an extreme wrist movement coupled with a finger and thumb search for the nut then getting it to turn after probably many years of being left alone…and there is one each side…Whilst attending to this task, the thought came that the re-install might well not be as simple as the usual handbook instruction that reads: To re-install simply reverse this process… Getting the heat control out was a good deal easier – remove the knob and with a deep socket wrench undo the retaining nut and pull the control back and down out of the way – see photo # 1. Now, withsome working room, I was able to locate the end of the choke cable. It seemed quite simple – the cable came back through the dash and was held in place with a nut on the threaded casing. However, the nut was very thin – see photo # 2 and there was not much room to install a spanner and turn it…and there were several rather sharp edges to bodywork panels. Just getting there involved getting skin scraped…. Duct tape had to be applied – see photo # 3. The very thin nut proved difficult to grip and a slotted ring spanner was brought on scene. It had to be cut down to allow turning in the restricted space – see photo # 4, but finally the thin nut was uncrewed all the way and the cable was ready to be pulled out. To enable this, the inner stranded wire line had to be released from its action arm at the rear carburettor. Once the air cleaner had been removed and an appropriate spanner had been found for the quite small clamping screw, simply pulling up the casing was quite simple… however, after a getting a painful prick by the frayed end of the inner stranded wire, care was paid to tape this off to avoid a repeat whilst effecting overall removal…. Before actually removing the cable, a search was done to check the routing. Not so easy to see, so a piece of string was taped to the carb end and then the old cable + string was pulled up and out through the dash quite easily.
The new cable had the same narrow nut as the old one and I wanted to use a normal-sized one – see photo # 2. So I fed the new cable in through the dash to have the knob up against the dash and let the cable go down in the inside to the floor. I then fed on the normal-sized nut and worked it up the cable and gave it a couple of turns to start it on the thread and taped it to avoid it possibly unscrewing. I then attached the string to the outer end of the cable and, pulling on the string and carefully feeding the end up and through the firewall, it came through quite easily only needing a jerk now and again. With the new cable pulled through, and the knob housing up against the dash, now came Round 2 of the “Bare Knuckle” fight. This involved getting the new nut to screw onto the housing. With the tape removed, and the nut being normal-sized, it was fairly easy to locate and twist with finger and thumb, but non-the-less, they had to be got up there and, with the actual space available and previous experience, the knuckles were protected with duct tape… Once the nut had been turned right up to be finger-tight involving numerous knuckle-contacts but now tape-protected, the final tightening could be done with the cut-down normal spanner – see photo # 4, which could be turned about a third of a turn… and then the fist + spanner withdrawn… Oufff …. and after connecting the inner cable to the carburettor the job was completed! ….. and, thank goodness, not one necessary to do again for quite some time. Duct tape removal was simple, if rather painful as it also involved the removal of most of the hairs on the back of the hand…. So, there you have it….. and I hope this article will help prospective cable replacers a bit more than what can be found on YouTube and handbooks which seems to focus on removal of the old cable with little on installing the new one which is not really “ To install new cable, reverse this procedure “….
Harv McCullough did the actual work and photos with Michael Hamilton-Clark writing the text.
Mark Collet has mended something!
Richard Hammond on the Greatest Barn Find of All Time
10 Minutes of Incredible Pre-war Battles and Drifts- Goodwood Revival
1966 Cortina raced in the Westwood Race track in the 70’s and 80’s.
Modified with a high performance engine delivering 185 hp
David Fonseka
Langley Area Mostly British Motoring Club (LAMB)
Queen Elizabeth II’s Private Car Collection
The Festival of Slowth 2019
TR6 Sunday Drive On Saturday
Edited by Gavin Strocel
S.F. Edge Trophy Full Race at the 74th Members Meeting
Lotus 7 Racing Car Sound 1957
1955 RAC Tourist Trophy Grand Prix Race in Ireland
Chateau Impney Hillclimb 2019
Video of Oct 5, 2015 Car Run
Michael adds some more background to the first run.
Harv and I meet occasionally for coffee, and on Thursday morning, 1 October 2015, we met at Decades. It was nice and sunny and afterwards we decided to go for a run up beside Cultus Lake. We set off with me in the lead, and when I was on Young having turned off Hoskins, I looked back – and no Harv… I back-tracked and could not see him, so went on for the run on my own. I called Harv later and asked what had happened to him…. turned out he’d pulled into the Chevron gas station on the corner of Hoskins and Young… and he remarked that the cardinal rule on a run is to keep an eye on the fellow behind – if he stops, you stop… so, lesson learned.
Harv also suggested that a message be sent to all Club members to invite them for an Impulse Run on the up-coming Monday, 05 October, to meet up at the Tim Hortons off Lickman for10:00am. The message was sent out and I got 5 replies. I made out a route map to go out along Cultus Lake and out to the end of Frost Road and then back to have lunch at Duke’s Pub on the corner of Yale and Chadsey. I took a dozen copies with me on the Monday and just as well I did, since a dozen cars turned up. The Run was voted quite the success and, for the monthly meeting on Friday, 16 October, I read out some verse I had put together to encourage members to come on further Runs.
Route map for first run.
IMPULSE RUNS
Said Harv to Michael one day
T’would perhaps be fun,
On an impulse, to go for a run…..
No plan, just meet and then up and away….
Michael thought that’d be great
So they tried it one day,
But things went astray
When Harv took a turn and Michael went straight.
So clearly there must be a rule:
Don’t be blind
Watch out for the car behind!!
Do this, and nobody’s caught for a fool
Said Harv to Michael a bit later,
Let’s take this run idea a bit further
To see if the members’d meet it with fervor If Yes then you be the curator
They drew up a short text
For Rob to put up on the website
It invited any member to write
To Michael if interested for what would be next
So Far only five replies have come
Maybe cars put away for the season
Is a major reason?
Still, a bit surprising with membership now over one hundred and one….
But there’d be those still working
And those who don’t like such events
Then those who take their fun in tents
And those who’ve perhaps yet to see the wording….
So I’d ask you, for the Spring,
Have a think of the fun
To be had on an hour or so’s Impulse Run And send me a YES to go with a Zing!!
03 October 2015
English car owners understand this completely…
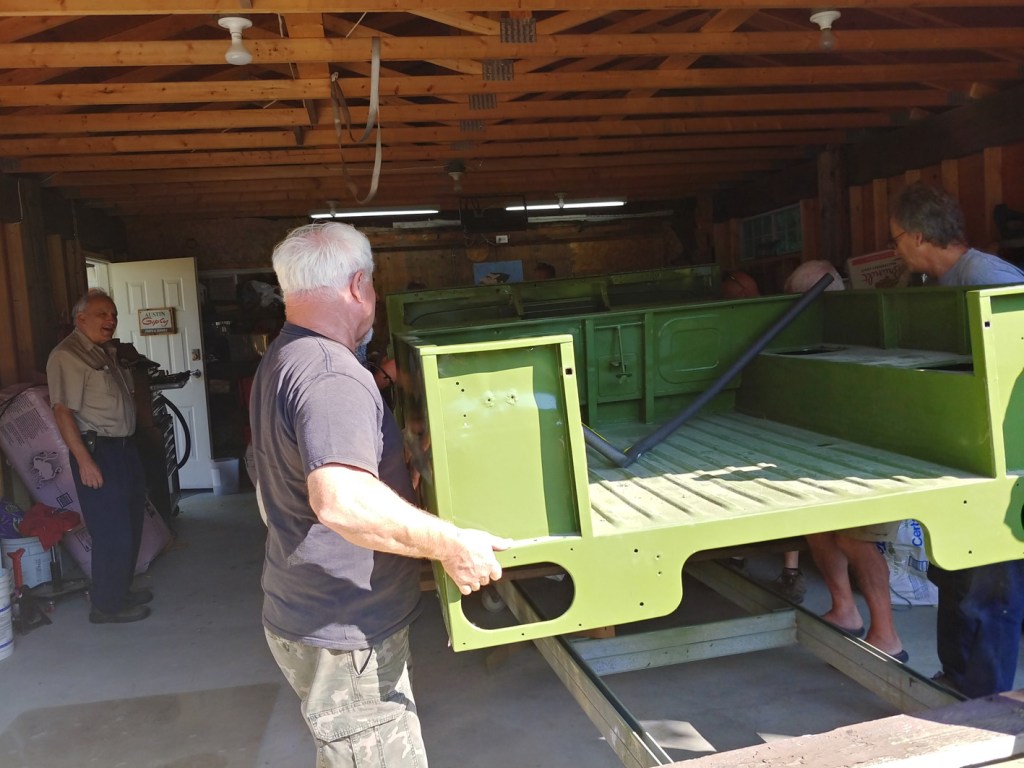
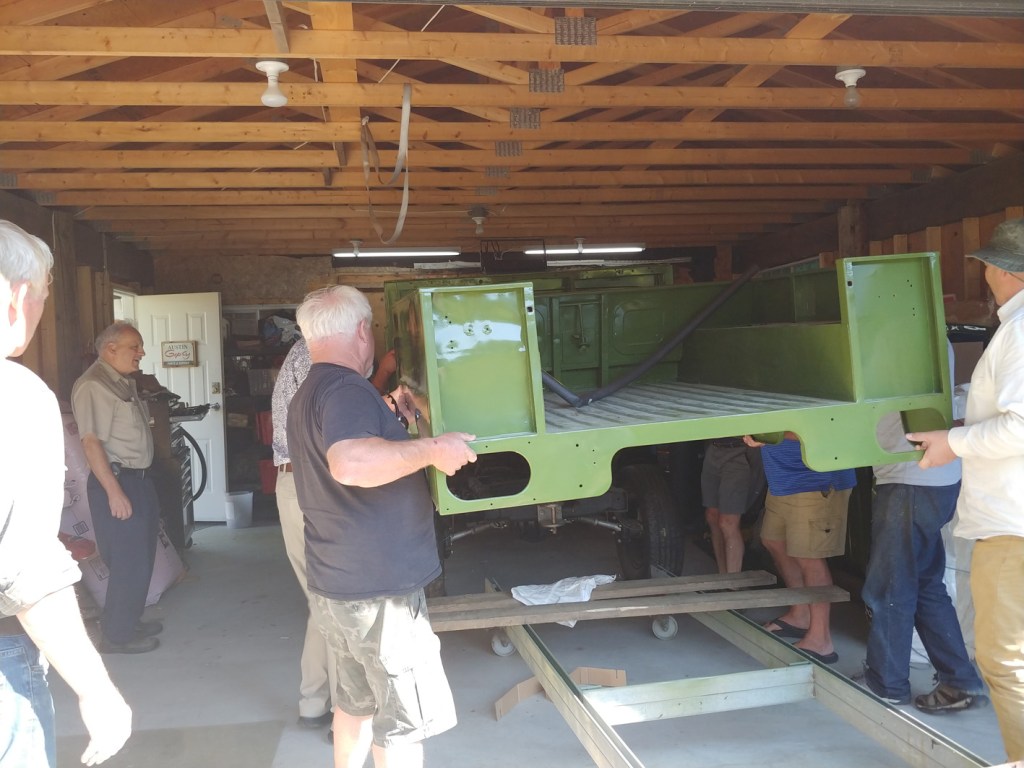
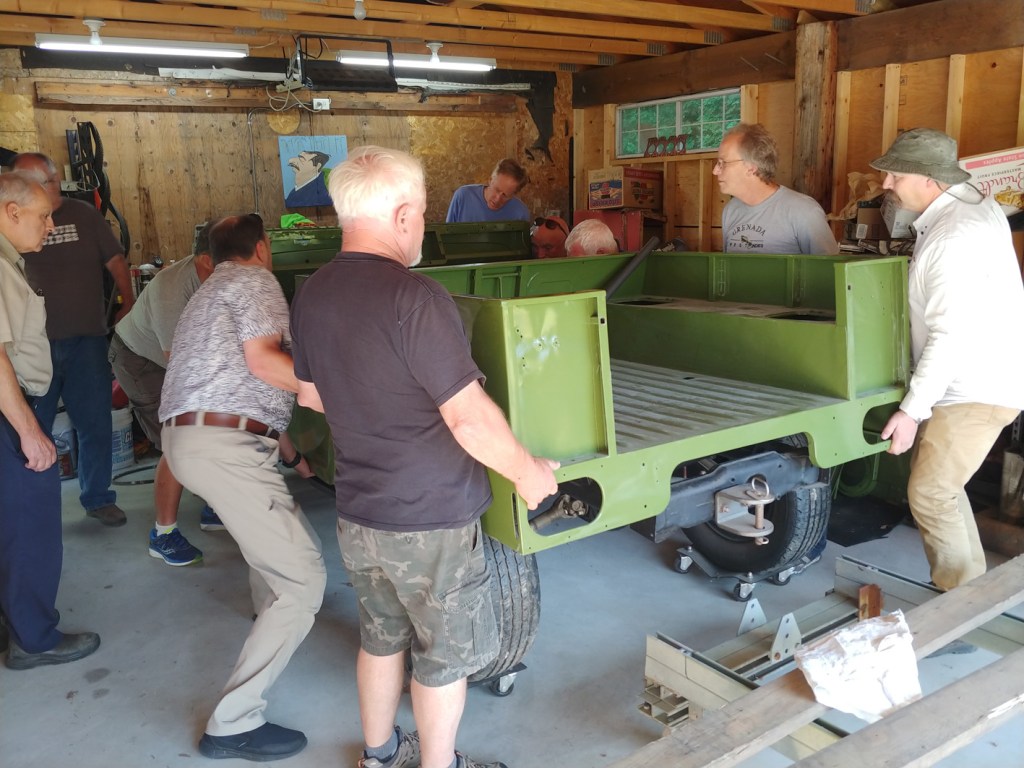
The Raising of Lazarus?
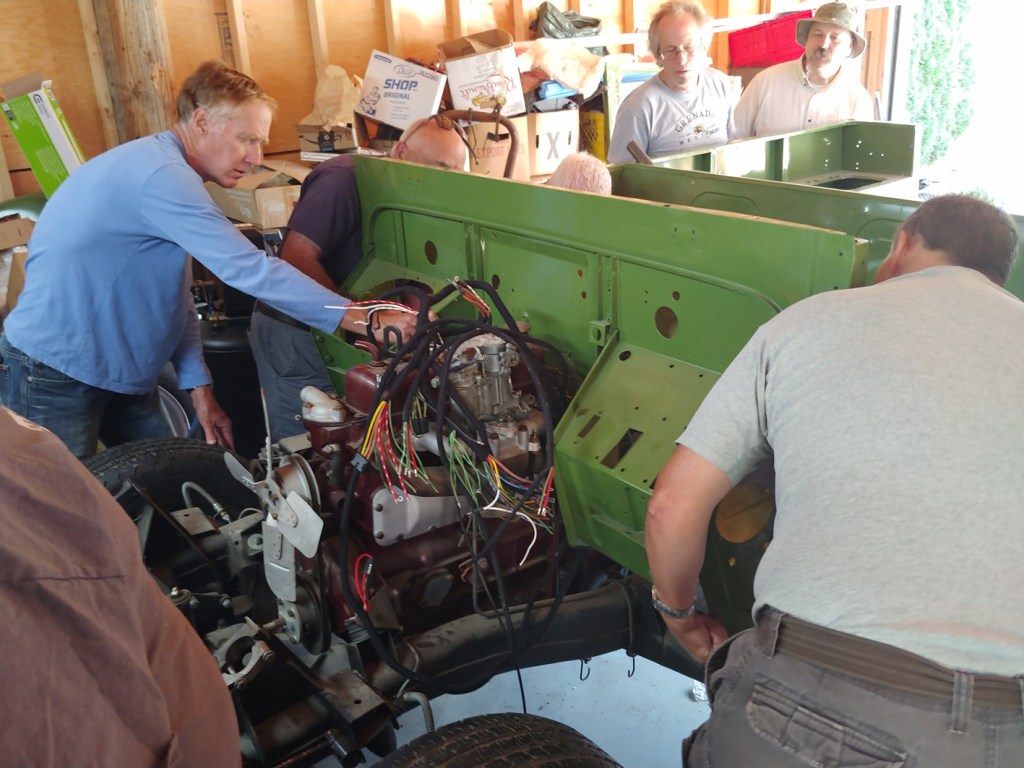
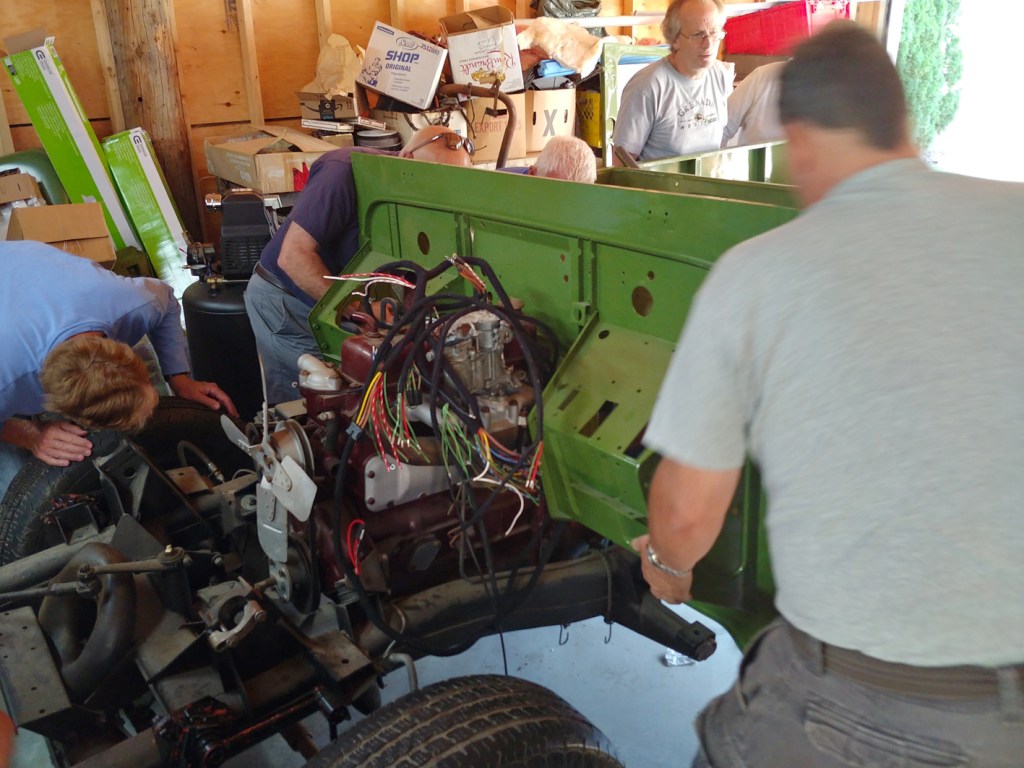
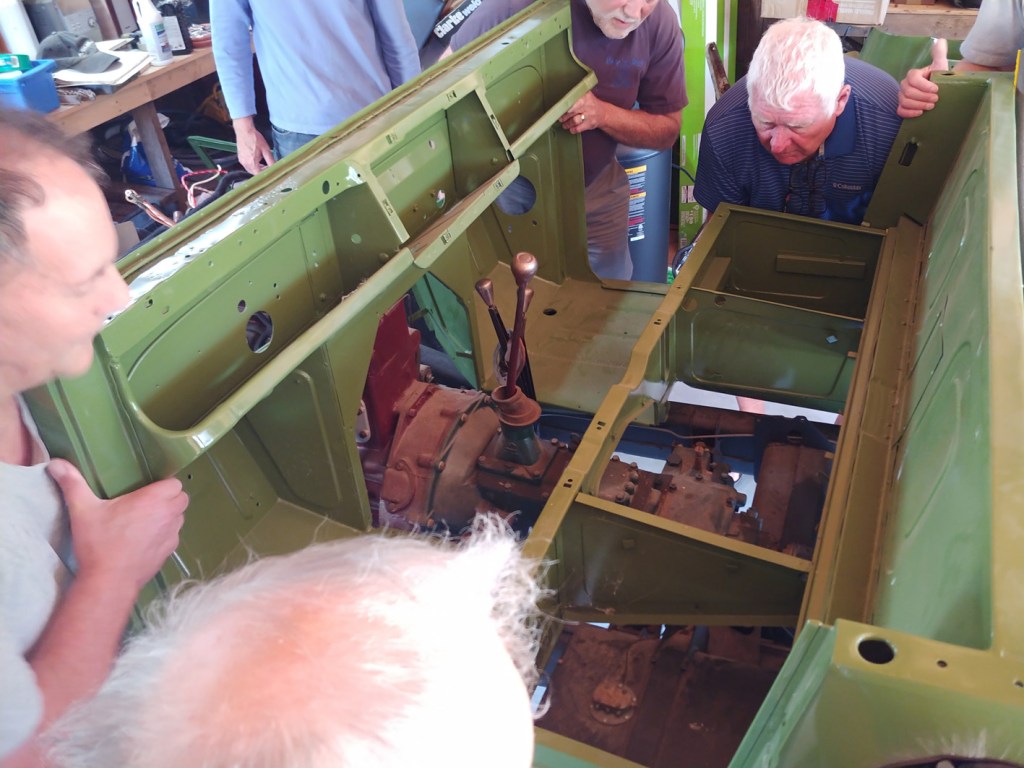
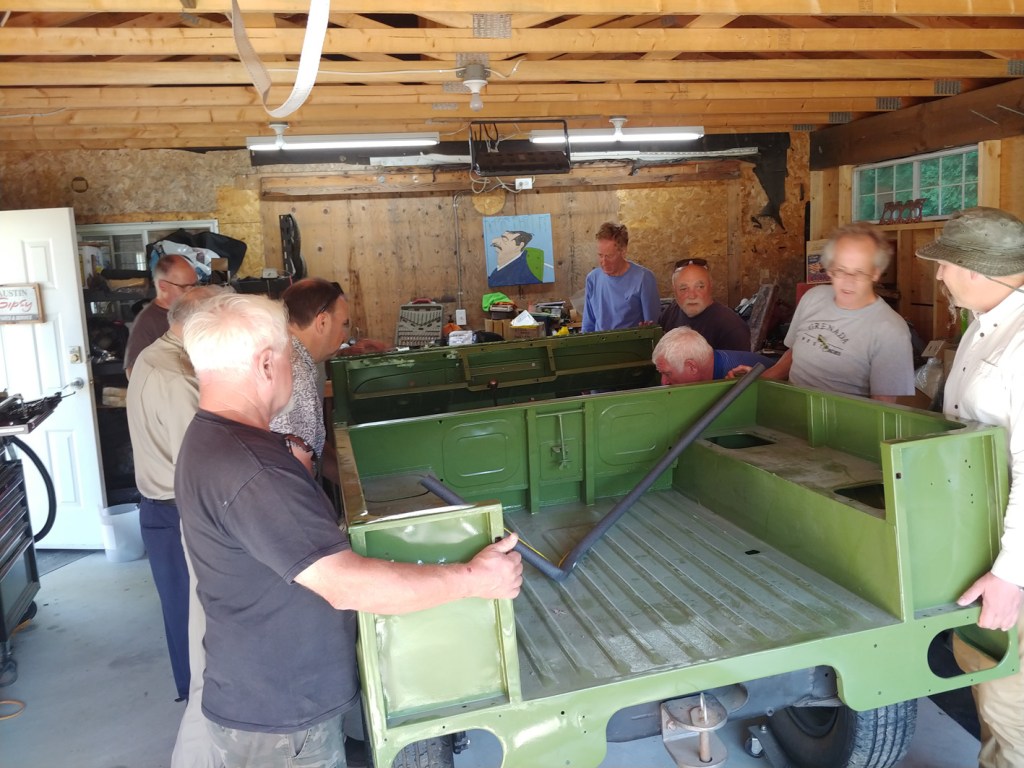
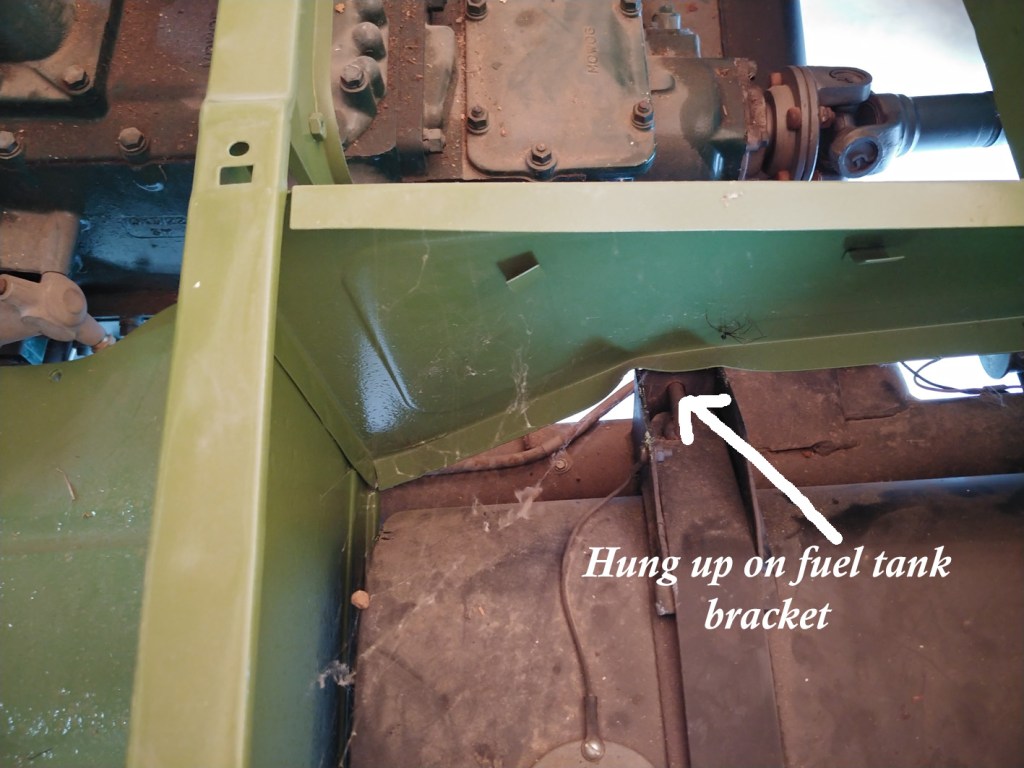
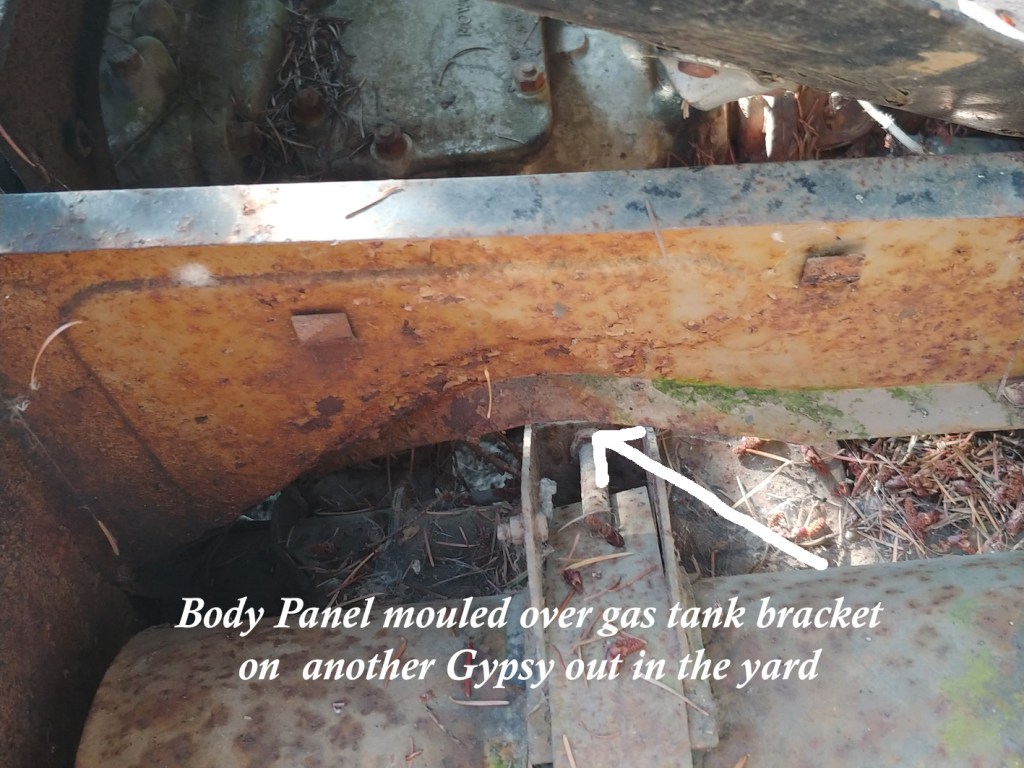
The Friday morning crew met at Bill McClure’s place in Yarrow with the purpose to assemble enough muscle to lift the refurbished body of Bill’s Austin Gypsy back onto the chassis. The lift went okay, but on lowering into place, the bottom of the vertical gussen panel hung up on the fuel tank bracket, which had been fabricated as a replacement to the rusted out original…. so had it been made up wrong? An inspection of another Gypsy out in the yard showed that the bracket appeared to be identical – and the lower part of the panel had been moulded to pass over the bracket — so, the solution would seem to be to do a similar profiling…. It appears that Bill will have some more work to make all comfortably fit….
Pictures of the grand Gypsy lift with the numerous individuals furnishing expert advice is presented below.

An Easy Adjuster for SU Carburettor Jets
Over the weekend I initiated my son Stephan into the mysteries of fine tuning a pair of SU carburettors. The recipient of the treatment was our 1965 MGB which was running a bit rough.
I told Stephan what to do and watched him at it. Having first checked the points and the fuel filter then the float settings for 1/8-in clearance- all ok – it was on to the jet settings. Having removed the air filters and checked free movement of the pistons – both dropped easily with satisfactory clicks, the suction chambers were removed and the jets brought up as far as they would go and then taken down the required two full turns and dabs of white paint put on the outward-facing facets. Back in with the piston / needle/suction chamber and start the engine. After a warm-up it still ran a bit pop-poppy, but much better, so back on with the air filters and out for a road test. Pick-up was not quite what I expected and I reckoned mixture was too weak. Once back home we were about to remove the air filters so as to get at the jet adjusting nuts when I had an idea…. the filters are awkward to re-install – one has to get the bridle in and behind in just the right place to be able to thread the bolts, which is fiddley and fishing for the dropped bridle is a hassle, so can one somehow have access to the jet nuts with the air filters in place?….Feeling around indicated no, not from the sides – can’t get the spanner in…but more feeling around indicated one could access the nuts from underneath…. but too stiff to turn by finger and thumb… now comes the point of this message – how about a purpose-bent spanner…. I had an Ikea spanner that had a 14mm jaw… 16mm was needed… over to the vice and file it wider then bend the shaft through 90 deg…. see attached photo… and Sweetness and Light, it worked perfectly and we were able to bring the jets down one more facet and now we have a nice smooth and responsive performance …..and a neat little gizmo for jet adjustment without having to remove the air filters…..
Now, have I merely “discovered” something that has been common knowledge for generations? Whatever, I feel it is worthwhile sharing.
Cheers, Michael Hamilton-Clark

Octane Rating
by Bence
MGB Rack and Trunk Capacities
Michael says…
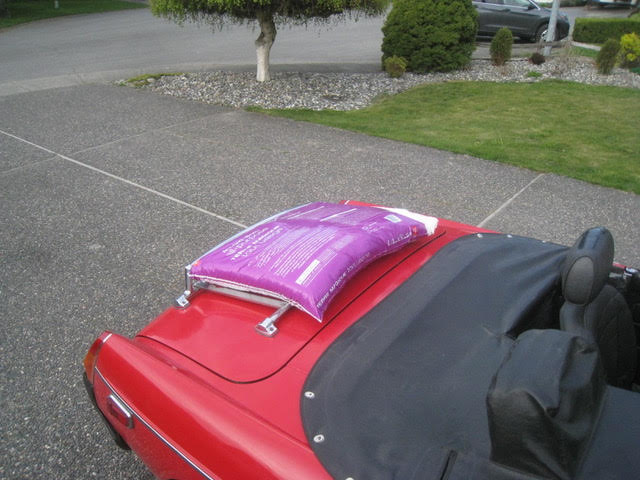
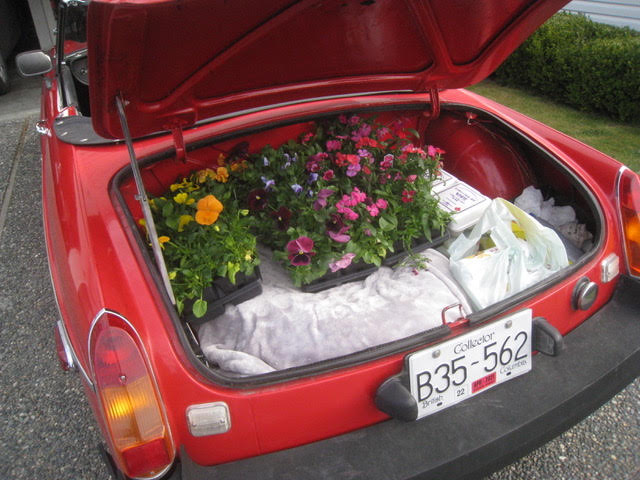
I went for a food shop and the Nursery for some patio flowers and potting soil this morning and, being a blue-sky day, took Big Red despite my wife’s remark that she was not sure how I thought I’d get everything on board…Well, I had no problem – the 50 litre bag of potting soil fitted just fine on the luggage rack and the three boxes of flowers went in the trunk + the eggs, laundry soap, 4 litre jug of milk, 12 apples and a box of tea, and room to spare…. See photos….. A bit of a Myth-Buster for remarks like “Not much more room than for a toothbrush” etc etc…..
Cheers, and keep well…
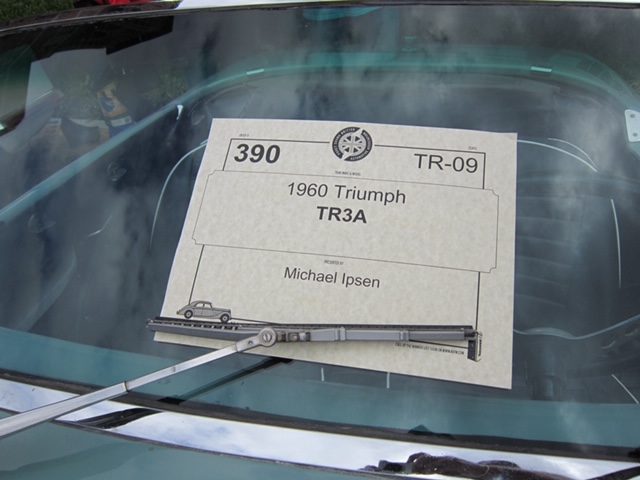
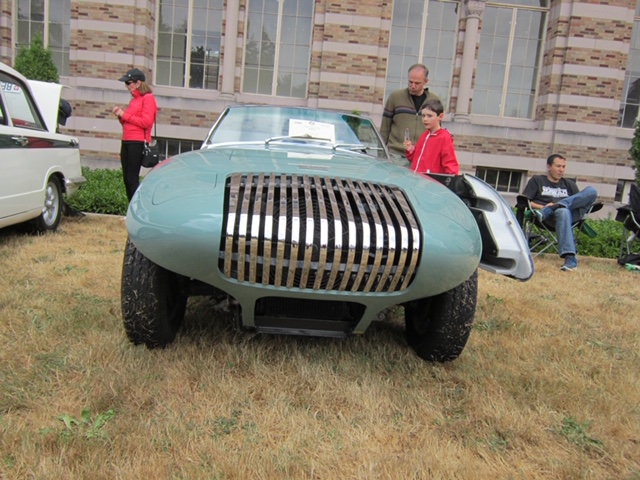
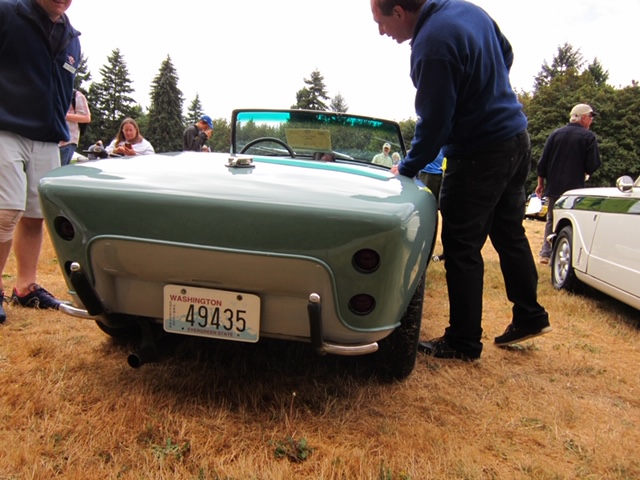
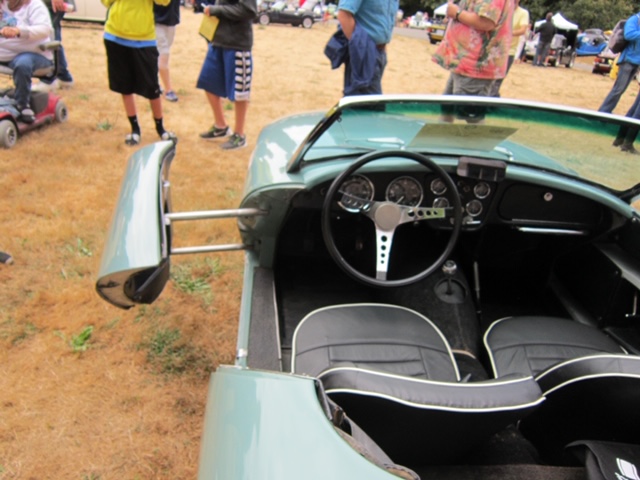
Bence sent us these pictures of someone using their imagination for a Custom Bodied 1960 TR3.
04/03/20
01/27/20
01/26/20
01/26/20
